> For the complete documentation index, see [llms.txt](https://ayakaleaf-pro.ayaka.space/llms.txt). Markdown versions of documentation pages are available by appending `.md` to page URLs; this page is available as [Markdown](https://ayakaleaf-pro.ayaka.space/texlive/ja/pakkji/minted.md).
# {Minted}
この記事では、次の方法を示します: [`minted` パッケージ](https://ctan.org/pkg/minted?lang=en) を使用して LaTeX 文書内でプログラミング言語のソースコードを整形およびハイライトする方法(例から始めます):
```latex
\documentclass{article}
\usepackage{minted}
\begin{document}
\begin{minted}{python}
import numpy as np
def incmatrix(genl1,genl2):
m = len(genl1)
n = len(genl2)
M = None #to become the incidence matrix
VT = np.zeros((n*m,1), int) #dummy variable
#compute the bitwise xor matrix
M1 = bitxormatrix(genl1)
M2 = np.triu(bitxormatrix(genl2),1)
for i in range(m-1):
for j in range(i+1, m):
[r,c] = np.where(M2 == M1[i,j])
for k in range(len(r)):
VT[(i)*n + r[k]] = 1;
VT[(i)*n + c[k]] = 1;
VT[(j)*n + r[k]] = 1;
VT[(j)*n + c[k]] = 1;
if M is None:
M = np.copy(VT)
else:
M = np.concatenate((M, VT), 1)
VT = np.zeros((n*m,1), int)
return M
\end{minted}
\end{document}
```
この例は次の出力を生成します:
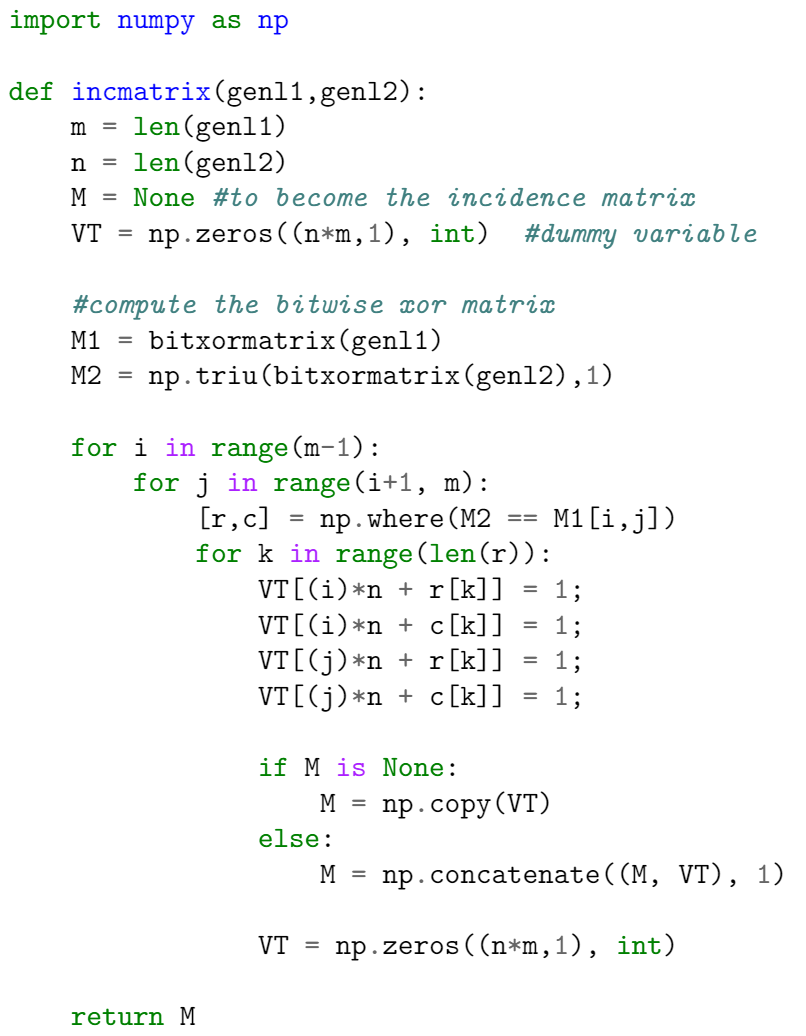
ここには 2 つの重要なコマンドがあります。プリアンブルではパッケージを次のようにインポートします
```latex
\usepackage{minted}
```
次にタグ `\begin{minted}{python}` と `\end{minted}` は、等幅フォントでテキストを逐語的に印刷し、コメント、キーワード、関数に色を付ける環境を区切ります。パラメータ `python` はソースコードが書かれているプログラミング言語です。 `minted` は 150 を超えるプログラミングおよびマークアップ言語、ならびに設定ファイルをサポートしています。サポートされている言語の一覧は [リファレンスガイド](https://www.overleaf.com/learn/latex/Code_Highlighting_with_minted#Reference_guide) を参照してください。
**注記**: For `minted` があなたの *ローカル* LaTeX 配布で動作するには、追加のプログラム [Pygments](https://pygments.org/) をインストールする必要があります。 [Overleaf](https://www.overleaf.com/) はそれをインストールしたり、文書をコンパイルするための特別なコマンドを実行したりする手間を省いてくれます — Overleaf 上では、 `minted` を使用する文書は「すぐに使える」ように動作します。
### 基本的な使い方
次の例が示すように、 `minted` 環境は組版されたコードの視覚的な表示を変更するように設定できます。ここで、 `minted` 環境は次の形式のいくつかのカンマ区切りパラメータを使用します `key=value`:
```latex
\documentclass{article}
\usepackage{minted}
\usepackage{xcolor} % to access the named colour LightGray
\definecolor{LightGray}{gray}{0.9}
\begin{document}
\begin{minted}
[
frame=lines,
framesep=2mm,
baselinestretch=1.2,
bgcolor=LightGray,
fontsize=\footnotesize,
linenos
]
{python}
import numpy as np
def incmatrix(genl1,genl2):
m = len(genl1)
n = len(genl2)
M = None #to become the incidence matrix
VT = np.zeros((n*m,1), int) #dummy variable
#compute the bitwise xor matrix
M1 = bitxormatrix(genl1)
M2 = np.triu(bitxormatrix(genl2),1)
for i in range(m-1):
for j in range(i+1, m):
[r,c] = np.where(M2 == M1[i,j])
for k in range(len(r)):
VT[(i)*n + r[k]] = 1;
VT[(i)*n + c[k]] = 1;
VT[(j)*n + r[k]] = 1;
VT[(j)*n + c[k]] = 1;
if M is None:
M = np.copy(VT)
else:
M = np.concatenate((M, VT), 1)
VT = np.zeros((n*m,1), int)
return M
\end{minted}
\end{document}
```
この例は次の出力を生成します:
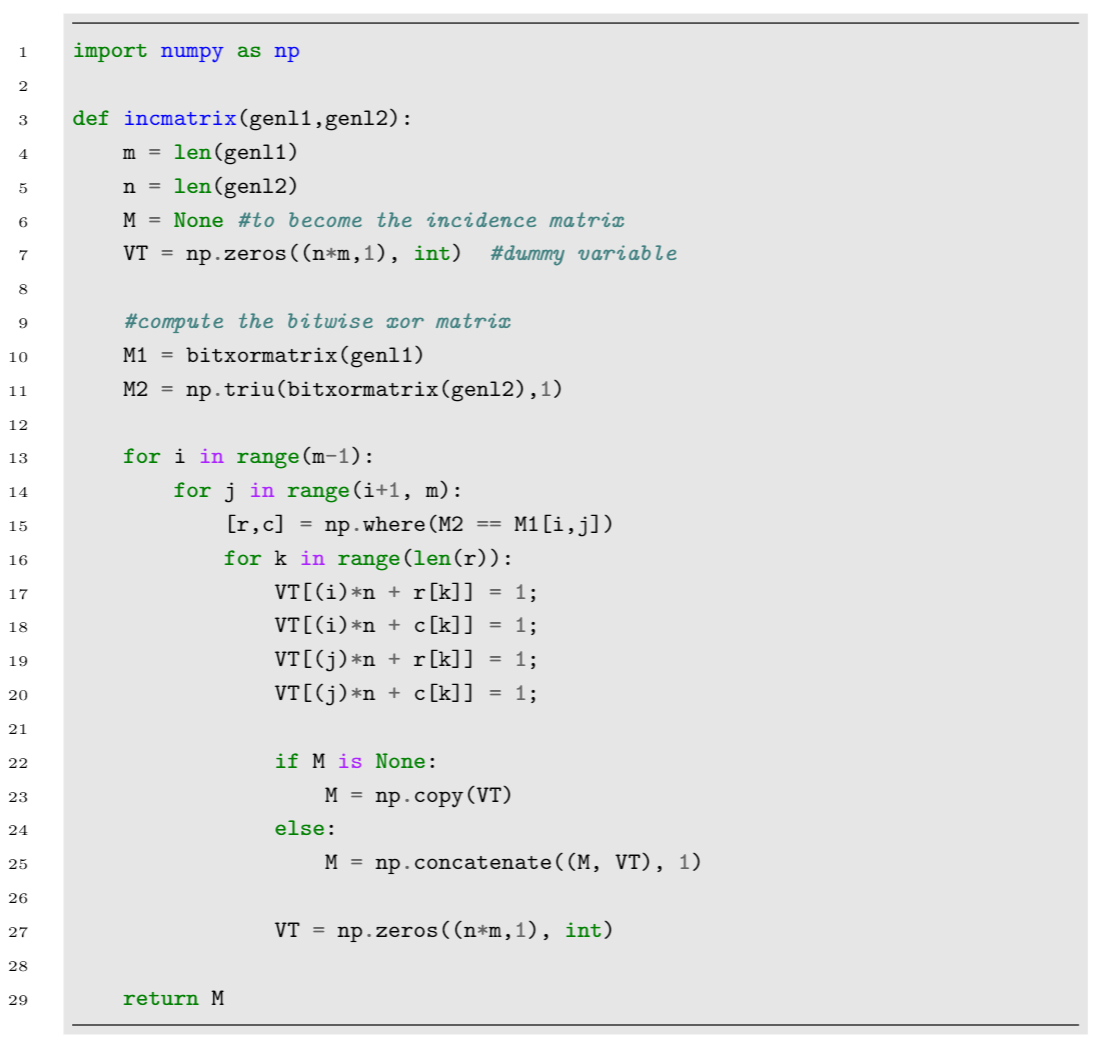
この例で使用されているパラメータは次の通りです:
* `frame=lines`: コードの上下にそれぞれ 1 本ずつ線を引いて枠を作ります。他の可能な値は `leftline`, `topline`, `bottomline` と `single`.
* `framesep=2mm`: フレームの間隔が 2mm に設定されます。他の [長さ単位](https://www.overleaf.com/learn/latex/Lengths_in_LaTeX) を使用できます。
* `baselinestretch=1.2`: コードの行間が 1.2 に設定されます。
* `bgcolor=LightGray`: 背景色が `LightGray`に設定されます。これを機能させるには `xcolor` パッケージをインポートする必要があります。色の操作について詳しくは [LaTeX で色を使う方法](https://www.overleaf.com/learn/latex/Using_colours_in_LaTeX) を参照してください。
* `fontsize=\footnotesize`: フォントサイズが `footnotesize`に設定されます。その他の [フォントサイズ](https://www.overleaf.com/learn/latex/Font_sizes_and_kinds%23Reference_guide) を設定することもできます。
* `linenos`: 行番号を有効にします。
役立つ可能性のある他のオプションは次の通りです:
* `mathescape`: コード内のコメントで数学モードを有効にします。
* `rulecolor`: フレームの色を変更します。
* `showspaces`: 空白を可視化する特殊文字を有効にします。
### ファイルからコードを取り込む
コードは通常ソースファイルに保存されるため、ファイルから自動的にコードをインポートするコマンドは非常に便利です。次の例のように:
```latex
\documentclass{article}
\usepackage{minted}
\title{Importing files using minted}
\begin{document}
次のコードはファイルから直接インポートされます:
\inputminted{octave}{BitXorMatrix.m}
\end{document}
```
この例は次の出力を生成します:
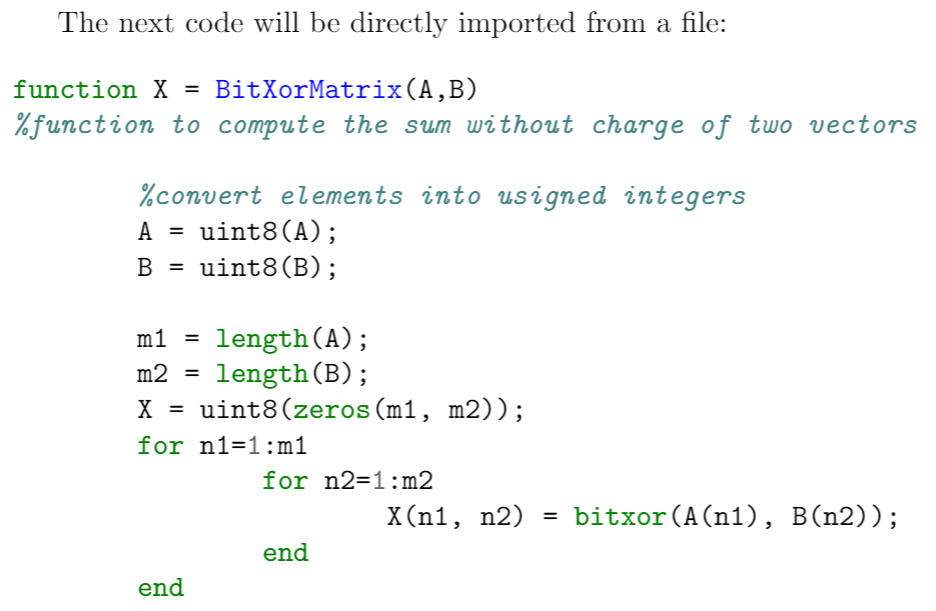 コマンド `\inputminted{octave}{BitXorMatrix.m}` はファイルからコードをインポートします `BitXorMatrix.m`、パラメータ `octave` はコードのプログラミング言語を LaTeX に知らせます。このコマンドはファイルの一部だけをインポートするために 2 つの追加パラメータを取ることができます。例えば、2 行目から 12 行目までをインポートするにはコマンドは次のようになります:
```latex
\inputminted[firstline=2, lastline=12]{octave}{BitXorMatrix.m}
```
### 1 行のコード
1 行だけ入力する必要がある場合、コマンド `\mint`(構文は次の例で示されています)が役に立ちます。
{% code overflow="wrap" %}
```latex
1 行コードの書式設定は \texttt{minted} でも機能します。例えば次のような小さな HTML の断片:
\mint{html}|
コマンド `\inputminted{octave}{BitXorMatrix.m}` はファイルからコードをインポートします `BitXorMatrix.m`、パラメータ `octave` はコードのプログラミング言語を LaTeX に知らせます。このコマンドはファイルの一部だけをインポートするために 2 つの追加パラメータを取ることができます。例えば、2 行目から 12 行目までをインポートするにはコマンドは次のようになります:
```latex
\inputminted[firstline=2, lastline=12]{octave}{BitXorMatrix.m}
```
### 1 行のコード
1 行だけ入力する必要がある場合、コマンド `\mint`(構文は次の例で示されています)が役に立ちます。
{% code overflow="wrap" %}
```latex
1 行コードの書式設定は \texttt{minted} でも機能します。例えば次のような小さな HTML の断片:
\mint{html}|Something here
|
\noindent は正しく整形できます。
```
{% endcode %}
この例は次の出力を生成します:
 波かっこ内のパラメータはプログラミング言語(この場合は`html` マークアップ言語)を設定し、実際に整形されるテキストは '|' 文字で区切られます。
### セルフホストされた Overleaf の問題
サンドボックスコンパイルを使用し、さらに Overleaf サーバーをデプロイに使用している場合、minted がうまく動作しないことがあります。詳細については次を参照できます: [issues/131](https://github.com/yu-i-i/overleaf-cep/issues/131)。minted を動作させるには ARM 命令プロファイルといくつかのシステムコールを有効にする必要があります。
---
# Agent Instructions
This documentation is published with GitBook. GitBook is the documentation platform designed so that both humans and AI agents can read, navigate, and reason over technical content effectively. Learn more at gitbook.com.
## Querying This Documentation
If you need additional information that is not directly available in this page, you can query the documentation dynamically by asking a question.
Perform an HTTP GET request on the current page URL with the `ask` query parameter, and the optional `goal` query parameter:
```
GET https://ayakaleaf-pro.ayaka.space/texlive/ja/pakkji/minted.md?ask=&goal=
```
`ask` is the immediate question: it should be specific, self-contained, and written in natural language.
`goal` is optional and describes the broader end goal you are ultimately trying to accomplish on behalf of the user. GitBook uses it to tailor the answer towards what is most useful for that goal.
The response will contain a direct answer to the question and relevant excerpts and sources from the documentation.
Use this mechanism when the answer is not explicitly present in the current page, you need clarification or additional context, or you want to retrieve related documentation sections.
波かっこ内のパラメータはプログラミング言語(この場合は`html` マークアップ言語)を設定し、実際に整形されるテキストは '|' 文字で区切られます。
### セルフホストされた Overleaf の問題
サンドボックスコンパイルを使用し、さらに Overleaf サーバーをデプロイに使用している場合、minted がうまく動作しないことがあります。詳細については次を参照できます: [issues/131](https://github.com/yu-i-i/overleaf-cep/issues/131)。minted を動作させるには ARM 命令プロファイルといくつかのシステムコールを有効にする必要があります。
---
# Agent Instructions
This documentation is published with GitBook. GitBook is the documentation platform designed so that both humans and AI agents can read, navigate, and reason over technical content effectively. Learn more at gitbook.com.
## Querying This Documentation
If you need additional information that is not directly available in this page, you can query the documentation dynamically by asking a question.
Perform an HTTP GET request on the current page URL with the `ask` query parameter, and the optional `goal` query parameter:
```
GET https://ayakaleaf-pro.ayaka.space/texlive/ja/pakkji/minted.md?ask=&goal=
```
`ask` is the immediate question: it should be specific, self-contained, and written in natural language.
`goal` is optional and describes the broader end goal you are ultimately trying to accomplish on behalf of the user. GitBook uses it to tailor the answer towards what is most useful for that goal.
The response will contain a direct answer to the question and relevant excerpts and sources from the documentation.
Use this mechanism when the answer is not explicitly present in the current page, you need clarification or additional context, or you want to retrieve related documentation sections.